Monday, December 1, 2008

Coding Resources

So we've got OSX and the SDK up and running, where do we go from here? Well the first place I checked was Apple's developer resources. While robust, they're really not much help for a beginner. The Training videos are nice and give you a better idea of how the iPhone OS works. I would suggest perusing those first. Here are some more GREAT resources:


BecomeAnXCoder

This is not an iPhone programming tutorial. It's an OSX tutorial. If you are a complete beginner though, this is where you should start. It breaks down everything into VERY simple terms. This is great if you don't understand basic concepts like pointers or Object Oriented Programming.


iCodeBlog

This is a very good site that has tutorials on specific topics. It's designed to start with the first post and follow them sequentially. He's even started posting video tutorials. Sample code is also available.


iPhone Developers Cookbook by Erica Sadun

This is a great book written by one of the first iPhone programmers outside of Apple. She really knows her stuff. The link above is for free, if you'd like to support this work, you may buy the paperback here, or buy the PDF here

Source


Stanford Course CS193P - iPhone Application Programming

This is exactly what it says. The prestigious Stanford University has a an iPhone development course and they are providing all the lectures (.pdf) and sample code (.zip) for free online. All this consists of is the PowerPoint slides in pdf format from the class, and of the handouts. No dialogue to go with the slides, although lots of them are helpful. I have tried to locate a podcast that the instructors might have put together, but haven't been able to find anything. I e-mailed them last week right before thanksgiving and haven't heard back yet, but with the holidays, it'll probably be a minute, if they respond at all.


Tuesday, November 11, 2008

Fixing, upgrading, and Installing the SDK

Ok, so you've downloaded all that software and you're ready to begin! The first thing we need to do is fix that annoying message about the audio drivers not working. Open Finder and in the search box, type "Extensions repair" without the quotes. Run the extension repair program, restart, and voila! Audio works! On my tx2000, the volume and mute buttons work, but the mute button is always orange. That's normal.

Next we need to install the_29's tx1000 package. So run that and restart. Now your screen should look normal :) You can also go into settings and there's many different options for screen resolutions.

Now the modified SDK file we downloaded SAYS it's for any version of Leopard, but there's 2 reasons I recommend you upgrade to 10.5.4

1) Better safe than sorry

2) Some of the frameworks or commands you use in your programs may not act as you expect them to on lower versions of Leopard.

So to make life easier, just do the upgrade. First run the 10.5.3 Update for AMD working. Then restart when it's done. Then run the 10.5.3 to 10.5.4 package. Don't restart when it's done though. Open up kexthelper b7 and install the system.kext file that came in the modbin kernel download. Then run the pcwiz kernel installer to install that kernel. NOW you may restart.

Woo hoo, we're almost there! Double-click the iPhone SDK you downloaded from Apple. It's a DMG file, which is actually a Disk Image. When you double click it, it will be mounted as a disk and show up on your desktop. Copy all 3 files out of the disk image onto your desktop. Then right click the mounted disk image and click "Unmount" from the pop-up screen. Out of those 3 files you put on your desktop, find iPhone SDK and move it to the trash can icon in the lower right hand side of the screen. Then locate the modified iPhone SDK file we downloaded from The Pirate Bay and copy it onto your desktop. Now double click that iPhone SDK file you just placed on the desktop. This will start the SDK installer. After it's done, restart and you will have a complete Dual Boot Vista OSX setup with the iPhone SDK running!

Required software for fixing things, upgrading, and SDK installation!

Ok, so we now have a somewhat working dual boot setup of Vista and OSX! Pat yourself on the back! Good Job! In order to make it truly usable though, we've got to install more software, and get that dang iPhone SDK on there which is the point of all this anyway! these will all need to be downloaded to inside OSX, unless you've installed MacDrive 7, if not Transmission is a good free torrent client for OSX. So fire up your torrent client of choice, and get the following software:

Monday, October 20, 2008

Repairing your Vista install and configuring Windows Boot Manager

Ok so you've got OSX installed and everytime you turn on your computer, it boots straight into OSX. Time to fix that so you may choose the OS you'd like to use everytime you turn on your computer.

Put in the GParted LiveCD and shut it down. When you turn it back on, hit F9 to boot from disc and get into GParted as you did before. This time, right click the flags column on the row of your HFS+ partition. click on the box next to 'boot', then click the close button. It'll re-scan your drives, then do the same thing on your Vista partition. Now shutdown and leave no discs in your drive. Hit F9 to boot from hard drive. it may boot right up into windows, if it does, skip to the next section, if it doesn't, then you'll get a screen saying something about winload.exe being corrupt or missing. Don't panic, just put in your Vista Recovery CD and restart. It'll say "Hit any key to boot from CD or DVD...." so hit enter. Then you get a screen saying "Windows is loading files..." with a progress indicator. This should take 1-2 minutes, then it shows you a language select screen. Select your language and hit 'next' After that, click on "Repair your computer" in the lower left-hand side of the window. Then it'll say "Finding Windows Install. Then it'll ask you if you want to repair it. Click "Repair and Restart". Remove the recovery disk before it restarts. Now you should get another error. Just select "launch startup repair" [in my notes of the process I said I got an error "boot selection failed because a required device is inaccessible." I think that's because I already did the dual boot thing. if you do get that, just hit enter and follow the rest of the instructions] then hit "Launch Windows Normally" Now it should boot up into windows.


When I got to my desktop, it installed a device driver for a "Generic Volume" which I assume is the Mac partition. It went successfully. I recommend MacDrive 7 for copying files to/from it in windows. MacDrive also burns Mac-formatted CDs and DVDs. It'll want you to restart after installing the device driver software, go ahead and do that. It should boot windows like normal. Now you need to copy the 'chain0' file from the leopard DVD. the only way I was able to do that was to hit the start button, search for it, then hit "Search Everywhere" at the bottom, specify the DVD as the search location and search again. Then it comes up and you can drag and drop it to C:\. Windows will ask you to confirm the operation, just click through that like you do with everything else windows asks you to confirm. Now close those windows, go back to the start button and search for "Command Prompt", right click it and select "Run as Administrator" Now type the following:


bcdedit /copy {current} /d "Mac OS X"


hit enter and it should say it completed successfully. Then:


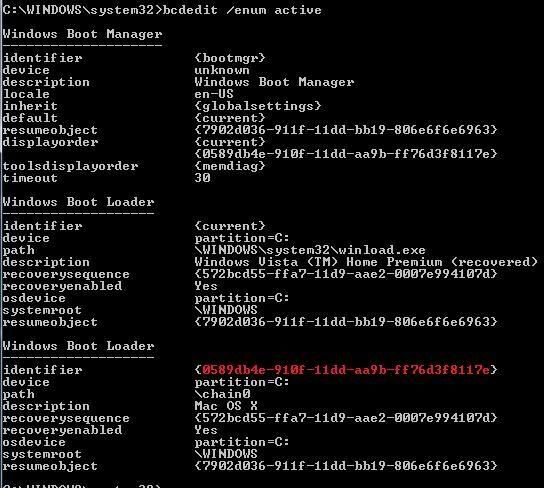
bcdedit /enum active


it'll show you a bunch of stuff. Now find your mac partition and the first ID number under it is called your GUID. so type the next command, but where I put GUID, you put that number


bcdedit /set {GUID} PATH \chain0


should say it completed successfully, if it didn't you probably have the wrong GUID in there or you just typed it wrong. If you can't figure it out, Here is a screenshot of mine with the GUID in red. See how it says "Description: Mac OS X" just find that on yours, then type the number above it, which will be in the same place as the one I have highlighted in red.


Now all you have to do is restart, then select MAC OS X at the bootmanager screen. Then hit F8, select your Mac Partition and OS X should boot like normal! (Don't forget to slide your power button twice at the IOAPIC line!) Now you'll have a working install of Leopard! What's that? Your sound doesn't work? touchscreen calibration off? Can't watch DVDs? Computer gets real hot? Those are some problems of running a hacked copy of leopard. Some can be fixed, some can't. The next post will be Required software for fixing things, upgrading, and SDK installation!


Thursday, October 16, 2008

Installing Leopard

If you're not using a tx1000 or tx2000 HP laptop, this post may not be very helpful for you. You can try it and see what happens, but if it doesn't work you'll have to try a different distro. This may require some research on your part. You will definitely want to know what hardware you have to determine compatibility with different distros. The ones I know of are called Kalyway, iATKOS, and Leo4All. There are different versions of each of these and different versions will work differently on different computers, clear enough for you? :D I would start by googling the names of the distros and see which one looks best, then download and try to install it. Good Luck!

For everyone else, the fun starts! If you picked up from the last post, you should see the Darwin bootloader come up. just hit enter to boot with no Options. It will freeze at one point, saying something about IOAPIC, just slide your power button twice and it should continue booting. this is required everytime you boot. When you get to the welcome screen, go up to the menu bar and select 'Utilities' then 'Disk Utility' select your partition, then near the top of the window, click 'Erase' for the filesystem, select 'Mac OS Extended (Journaled) and click agree. It should erase in less than a minute. Now close that, and at the welcome screen hit 'Continue' (or 'Next' can't remember now) Agree to the license agreement. Then select your partition at the next screen. Once you've done that and continued, hit the 'Customize' button in the lower left-hand side of the window. Select the following options:

  • AMD-System-Fix
  • TimeMachineFix
  • Under third Party Drivers select
  • chipset drivers > nForce 2/3/4/5 chipset driver
  • Audio Drivers > AzaliaAudio
  • Graphics Drivers > NVidia Driver > NVinject GO
  • Network Drivers > ForceDeth Driver

    Now that you're done, get out of that screen and click 'install'. Don't skip the DVD check the first time around. It takes extra time, but if you get an install error, this could be why. Just let it do its thing. The install process should take 30-40 minutes. If the progress indicator freezes, slide your power button to update it. Once it's done, it should say "Install Successful". click the restart button. After restarting and before the "HP Invent" screen goes away, you need to remove the disc from the drive. Then you'll see the darwin bootloader. hit enter. You may have to select your partition, then hit enter again. Don't forget to slide your power button when it freezes at the IOAPIC line. Then you'll go through the OSX Startup sequence. Now you should be running Leopard! Woo hoo! You'll probably get an error message about the audio drivers not installing correctly. Don't worry about that just yet, we'll fix it later. Play around with it if you want, but we're not done yet. We still have to be able to boot whichever OS we want, right?

    Next section: Repairing your Vista install and configuring Windows Boot Manager


Wednesday, October 15, 2008

BIOS fix and Partitioning your drive

Ok the first order of business is to run that HP BIOS updater program. Now I'm calling it an 'updater' it actually downgrades your BIOS, but it doesn't matter. For sound to work, you must use this. Just run the .exe you downloaded and follow the on-screen instructions. It's simple and straightforward. Restart at the end of it.


Now to partition your hard drive! In Vista, click on 'Computer' and right click your C:\ drive, then click "Manage". Right-click your main partition (NOT HP_RECOVERY!!) and click 'shrink' I had 120GB free and it would only allow me to make my partition 17GB or as displayed on this screen 17000 (that's megabytes).


If you are unhappy with the amount of space windows is allowing you to have for your new partition, you must defragment. You can't use any old defrag program either, you must use one that moves your system files like PerfectDisk. In order to get more shrink space, you must do a SMART defrag a couple times and do a boot-time defrag a couple times. This jumped me from 17GB to 57GB available. You MUST do it this way or you could really trash your Vista install, Master Boot Record, or both (like I did :) )


Now pop in that GParted LiveCD and restart your system. Hit F9 to boot from the disc.When the menu comes up select the 'failsafe mode' and hit enter. It's the only mode I could get it to run under. When it asks, don't modify the keymap. Then again it'll ask what language you want, type '02' (without the quotes) for English. Then it'll give you a notice about the video drivers, just hit enter. Once you see the GUI start up, just wait a second and GParted will start automatically. Now right-click the unallocated partition you made and click 'New'. Set the size if you need to (mine was already set to what it needed to be) For filesystem select 'HFS+'. Then click 'Add'. Now it'll show up at the bottom of the window, just right click on it and hit 'Apply'. For some reason this left 1.83GB unallocated on my drive, I'm just happy I got it to work, so I haven't tried to mess with that. Now click the shutdown icon and shut down. It'll pop the drive open and tell you to remove the CD. Do this and put in your Leo4All v2 disc in and close the drive. Once it says 'System Halted' turn it off using your power button, then back on. Hit F9 to boot from disc again. Before you hit enter to boot from disc, plug in your laptop, because IT WILL NOT BOOT otherwise.


Next step is Installing OSX!

Required Software and where to get it

This section is the required software for Before OSX (will be referred to from now on as BO, or the time before you have installed OSX) :) Once we get OSX installed, you will have to download MORE software to get everything running correctly. If you don't know how to download torrents, you need to learn now. (Click here for more info.) So here's what you need with the download link next to it.

  • Windows Vista Recovery CD - Download
  • GParted LiveCD - Download (Download from a mirror, I had to in order to get a working file)
  • Leo4All v2 - Download
  • HP BIOS Updater (tx2000 only!) - Download
  • HP BIOS Updater for tx1000 - Download

    If you're not doing this on the same laptop as I am, then Leo4All v2 may not be the one for you. It does work for many AMD and Intel systems and might work anyway. I tried about 15 installs of different distributions of OSX before I found this thread which directed me to the correct one. For instructions on installing OSX on many different computers, check out this wiki. It has many different computer models and how to install OSX on them. Another thing to note, if you can't find a success story for your model, is that some distros may install but not everything work (like wireless or sound) I had this problem with iATKOS v4a. It's just a crapshoot on the right distro for your computer.

    Also BACKUP YOUR VISTA PARTITION!! You may not need it, I only had to restore mine once (that's through the process of probably 18 OSX installs) but everybody's computer is different and everyone makes mistakes. DON'T take any chances with your precious data! I used Norton BackItUp, which isn't the best in the world, but it's better than no backup, plus it can restore your partition to exactly how you had it.

    So once you download all this crap, you have to burn it to disk. I used MagicISO to burn all of these and it worked great. So burn the Vista recovery CD to a CD. Burn the GParted LiveCD to CD. Burn the Leo4All v2 .iso to DVD, and don't burn the HP BIOS updater to anything.

    The next step is BIOS fix and Partitioning your drive

Introduction

This blog is a complete n00bs guide to setting up a Windows Vista, AMD-based laptop to Dual-boot Vista and OSX and install the iPhone SDK successfully. I used an HP tx2117cl tablet computer to install this, so if you're using a different laptop, some things WILL BE different. Most of this will apply to the tx1000 series of tablets also. The main part that will be different for other laptops or desktops is what distribution of Leopard to install. If you are looking to buy a computer to do iPhone development and don't want to shell out the money for a mac, then you could go to Sam's Club and get the exact laptop I'm using for around $900. For the purposes of this blog, I will give exact instructions for my laptop only. Once you get Leopard up and running, everything else is pretty generic. I will add in tips wherever I can to help everyone not using the same laptop as me. Just for the record, this has been THE PERFECT computer (for me) to dual-boot these OSes. I get all the tablet functionality in Vista and most of the OSX functionality there. Also I have the benefit of having the native development environment, but I can go back to Vista for everything else I need.

This blog is NOT a support center. I'm dedicating very little time to it since I'm trying to learn a new programming language and make a hot new iPhone game. Feel free to ask questions since other people will read this, I'm sure. If your question is easy enough or I just happen to have time on my hands when you ask a question, I may answer it. Since I don't have a lot of time to dedicate to this, I'm not 100% I should even do it, but there seems to be lots of confusion out there about how someone with a Vista machine can develop iPhone apps without buying apple hardware. If you have problems, some good places for help are InsanelyMac or ModMyi

If you're planning on writing apps for Cydia or Installer e.g. non-AppStore apps, this blog is not for you. Just lookup instructions on installing the gcc toolchain, I haven't done it, but I'm sure it'll be much easier. If you are developing an AppStore app, then this will be the best way to go. It's also the best way for a beginner (like myself). Also I don't know how you'd sign your apps without the OSX environment anyway.

After installation of the OS and SDK is complete I will also have as many links (non-Apple) as possible to tutorials for Objective C. I have a background in Qbasic, Visual Basic, Java, and C and Objective C is very very different. I am very impressed with the instructionals Apple provides, but for someone with very little Object Oriented programming experience, it's a challenge. It's probably more of a challenge since I'm used to non-object oriented programming.

For Reference purposes, here's my tablet's specs:

AMD Turion 64 TL-62 @ 2.1 GHz

3GB RAM

250GB WD Hard Drive

Nvidia GeForce Go 6150

Nvidia nForce Networking Controller

Nvidia nForce SATA controller

Next post will be Required Software and where to get it